
Teamwork: testing an APC UPS with Synology NAS
An uninterruptible power supply (UPS) is used to keep servers or PCs running in the event of a power outage. Not every UPS works straight out of the box. The APC Back-UPS Pro 1200SI does.
The last time I tested an uninterruptible power supply (UPS), I got annoyed. It was a Vertiv Edge, and I couldn’t establish a data connection to my Synology NAS (network storage). My PC connected fine. As a result, my network storage would continue to receive power from the Edge UPS in the event of a failure, but wouldn’t automatically shut down. Even an expensive third-party card that added a network port and SMTP server to the device couldn’t fix my problem.
The APC Back-UPS Pro 1200SI is different. Admittedly, I was nervous as I started testing due to my Vertiv UPS experience. But this already gives way after a few minutes. Rarely have I spent so little time installing and configuring as I did here.
I got my test UPS from the manufacturer and used it for about four months.

If the device’s battery ever starts to weaken, you can replace it yourself (APC replacement battery no. 161) in a few simple steps. According to the manufacturer, it should last for three years. As soon as it needs to be replaced, the UPS tells me so via its display.
Design, ports and technical data
The UPS battery weighs over five kilogrammes and has a capacity of nine amp hours (24 volts). It already comes installed, but not yet connected. To do this, I open the right side of the device. This is as simple as removing the battery cover of a Game Boy. Next, I lift the battery a bit according to the manual and plug in a red cable. Then I put it in its original position and close the device.
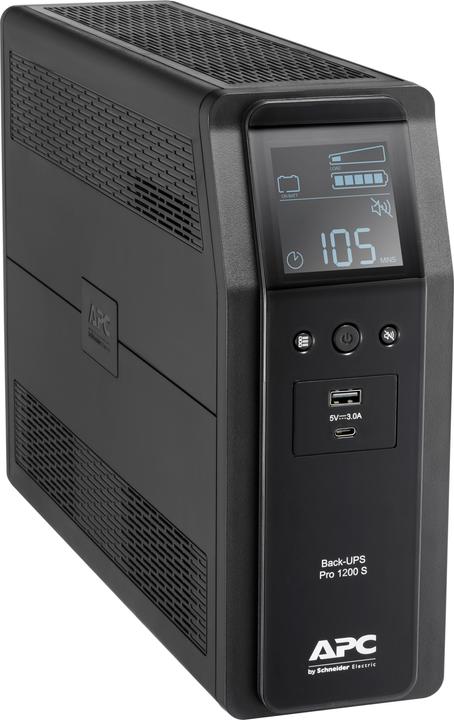
Looking at the front of the UPS, I see a large display. Below that are three buttons: a display, power and mute button. The latter is useful if you don’t like the high-frequency beeps that this device emits, for example when there’s a power failure.
Source: Martin Jud
Below the buttons you’ll find the first power connections. With the USB-A and USB-C ports, you can charge devices with up to a total of 15 watts. Thus, the UPS is also a large power bank. But it’s too tedious to carry around. For the USB ports, as well as six power output jacks on the back of the unit, power is only supplied from the battery when the UPS isn’t connected to the mains – or there’s a power outage. Furthermore, all power connections on the device benefit from surge protection.
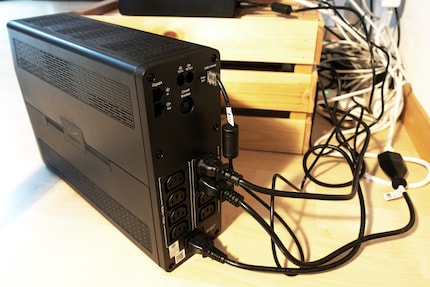
Moving away from power connections, the device can also offer surge protection to a telephone and an Ethernet cable. There are two phone and RJ45 ports each at the very top centre and left back. A proprietary data port is located at the top right. It looks like a network port, but it’s a combined USB and serial port. A corresponding USB cable is included – not so for serial. The port is used for data connections between the UPS and a computer or other device – for example, my NAS.
Source: Martin Jud
The power input jack (type C14) is at the very bottom of the rear panel. The input circuit breaker is again at the very top, below the telephone cable connections. Eight C13 power output sockets provide connection options for external devices at the lower end. Note, two of the eight ports (bottom right) only provide surge protection and don’t receive power from the battery in case of a power failure. They’re intended for any devices that may remain without power in an emergency – printers, for example. The remaining six ports provide uninterrupted power.
The maximum allowed load of all devices attached to the UPS is 720 watts. It measures 36.8 × 10 × 26 centimetres and weighs 11.7 kilogrammes.
Connecting devices and connecting to the computer as well as NAS
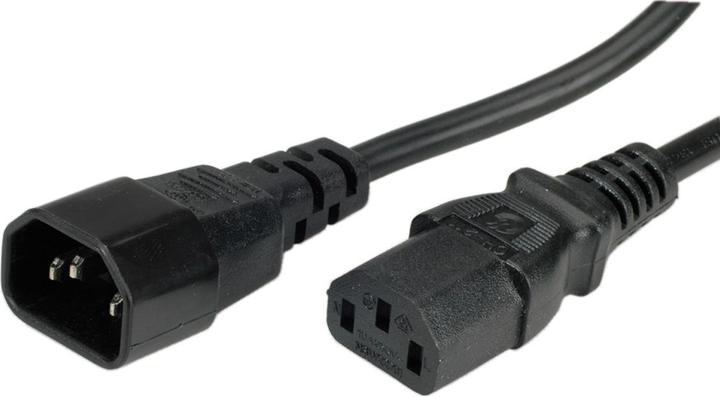
I find it irritating that there’s no type C13 power cable for the input socket included in the box. Thankfully, I’ve got just such a cable in stock. What’s included instead are two type C14 to C13 converters. Think this:
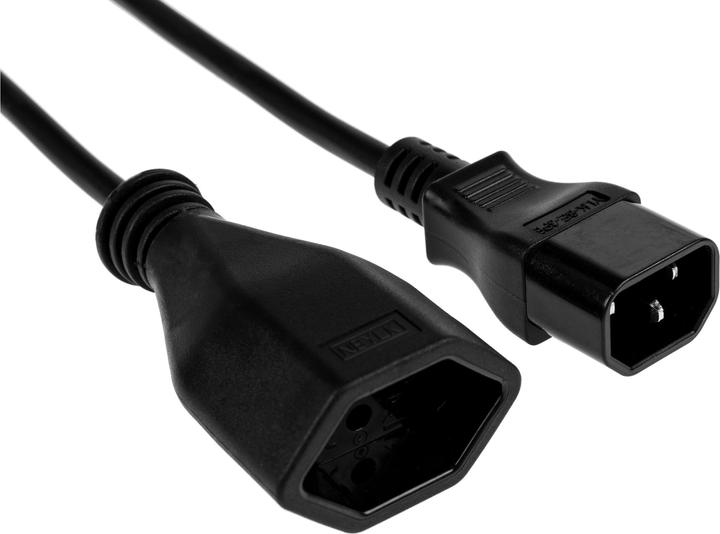
Furthermore, the aforementioned USB cable and a manual come in the box. In order for the uniquely frustrating Swiss power plugs to connect to the UPS, I further procured the following cable:
I connect the cable to the UPS and add the following devices. A modem, a router, a Switch and my network storage from Synology. I consider it the most worthy of protection in the entire household. Not that I ever felt unsafe without a UPS; I regularly create a backup. Besides, I’ve never had any problems with UPS-free NAS operation over the course of more than 15 years. But who knows, my luck might run out one day.
After pressing the power button, I hear a high-pitched beep followed by a clacking noise. All attached devices immediately spring to life. It takes about 15 seconds for the UPS to become fully operational. On the large display, the device lets me know that self-tests are in progress with a flashing online icon followed by a flashing battery icon. Then the online icon stops and the battery icon goes out. It’ll report back as soon as the power goes out.
USB connection to the computer: plug in and you’re done
Now that everything has power, I can worry about data connection. The first thing I do is grab a Windows computer. However, I won’t continue to run it on the UPS after today, since it usually isn’t near the other devices. I connect a USB cable to it, and the UPS is immediately recognised. In the Windows 11 Device Manager, it’s listed under the Batteries tab as an HID UPS Battery.
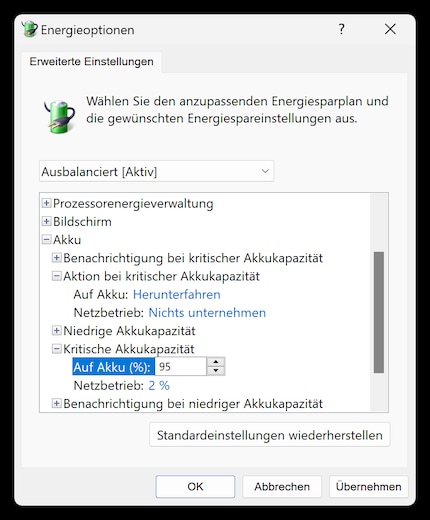
Going into the advanced Windows power settings, I can now define what action Windows should take when battery capacity is critical, and at what percentage of battery life this should happen. So, for example, the PC should shut down as soon as the UPS battery is at 95 per cent.
Source: Martin Jud
APC offers Windows users an app with more configuration options. I’ll discuss these in the section on operation.
USB connection to the Synology NAS: plug and play
I’m a nervous wreck as I connect a USB cable to the Synology NAS. This is exactly where I had problems with Vertiv.
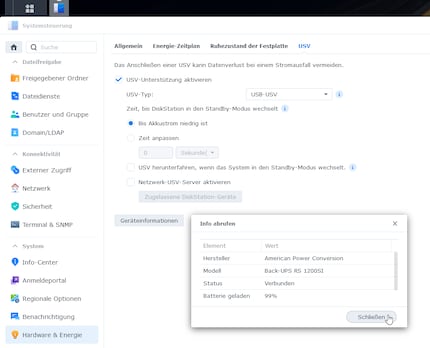
Even before plugging it in, I call up the web interface of my NAS (DiskStation Manager) to see if anything is wonky in real time. I’m relieved when, right after plugging it in, a message appears that there’s now a UPS attached to the device. I go to the Control Panel, click on Hardware & Power and open the UPS tab. There, under Device Information, it now says that the UPS has been connected and you can enable UPS support.
What an amazing moment. Just plug it in and the connection is established. In future, I only want test devices where everything runs smoothly.
User experience: on the UPS, in the NAS settings and on PC
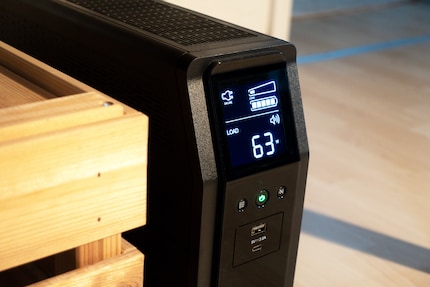
Device operation itself is relatively self-explanatory and simple. On arrival, the display is set to go out after one minute. I can tell the device is turned on because the power button glows green. If I want the display to always light up, I can activate this by holding down the display button for two seconds.
Source: Martin Jud
If I press any of the three buttons briefly, the display pops up and I see two pieces of information divided by a dash. Everything above the line is always displayed. Things like whether the UPS is connected to the power supply or is running on battery. Likewise, that section indicates whether the battery has to be replaced due to age. Furthermore, there’s a symbol indicating load intensity and battery life.
Under the dividing line there’s a key figure and secondary info about problems (system error, overload, automatic voltage control). Immediately after starting the device, the currently applied mains voltage is shown there, usually 230 volts in Europe. In my household, it fluctuates between 228 and 233 volts. Later, the display will always show first what was last viewed during your previous access. Pressing the display button, the screen changes from input voltage to the current frequency of the mains voltage, normally 50 Hertz in Switzerland. Pressing it again takes me to the following additional metrics, one after the other: output voltage, number of events (power failures), estimated remaining battery time in minutes, applied load in watts, applied load in per cent.
Besides getting info, there are few direct settings on the UPS. It’s worth mentioning that you can permanently mute alarms by holding down the respective button. And by pressing the power button for six seconds, I can switch between three sensitivity levels. They determine how strongly the device reacts to voltage fluctuations and thus switches to battery mode. By default, this is set to High – should the device switch to battery mode (too) often and lead to the aforementioned annoying beeps, I can downgrade to Medium or even Low.
NAS settings: simple and functional
With my Synology NAS, I can configure the UPS using on-board tools in the system settings.
Source: Martin Jud
I can choose whether my NAS goes into standby mode by itself after a certain time or when the battery is low. This means that the NAS will continue to run, the hard disks just won’t be used. If I want my NAS to turn off as soon as it’s in standby mode, I can set that up as well. To do this, check the appropriate box labelled «Shut down UPS when the system enters Safe Mode». If there are other Synology devices on the same network connected to this UPS as well, there’s also the network UPS server function to forward a signal picked up at the USB port.
PC settings using PowerChute Personal Edition
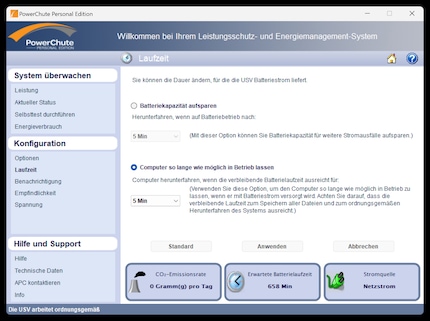
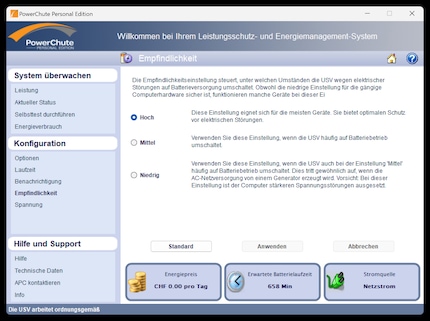
For PC, APC provides the Windows app PowerChute Personal Edition. It offers an old-fashioned design and the following, partly useful, functions:
- An overview of your current UPS status (including energy consumption in kWh per day).
- A list of previous power supply problems.
- An energy consumption calculator with a record of past usage.
- Options for manually triggering self-tests, app beeps, and audible UPS notifications.
- Settings in the event of power failure – either shutting down after a defined time frame or when a defined minimum battery lifetime has been reached.
- Setting sensitivity level – either with High, Medium and Low or directly by manually entering the voltage to be exceeded or undercut.
Source: Martin Jud
Source: Martin Jud
Besides choosing when the PC shuts down, PowerChute offers slightly more than the default UPS settings. There aren’t just three sensitivity settings, you can set it manually. If my preset voltage value is exceeded or undershot, the UPS switches to battery operation. The energy consumption calculator is a nice addition, also requiring the app. I didn’t do more than a surface-level test of the software, as I primarily ran the device connected to the NAS for four months.
Power outages and voltage fluctuations: how the APC UPS copes over months of testing
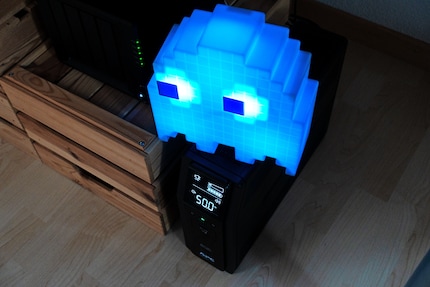
Following my Vertiv UPS test, a kind reader pointed out that it’d be good to know how much power the unit itself uses. That is, how much electricity is used just to keep it running. I reach for a Steffen ammeter and use my Pac-Man ghost lamp as an auxiliary tool.
Source: Martin Jud
The lamp displays various LED effects one after the other and needs between 0.6 and 2.6 watts when I run it without the UPS. With the UPS, I measure a consumption between 3.1 and 6.2 watts. Thus, the UPS itself needs 2.5 to 3.6 watts. Nice. If I switch off the UPS and leave it connected to the mains, it consumes 2.4 watts.
After that, I perform ten manual power outages to check basic operation. The device easily manages an uninterrupted power supply with the attached network devices. My NAS goes into standby after the five minutes I defined. I don’t want to keep it running for too long to protect the battery. And my patience.
After the ten mini-blackouts, I set the time until my NAS goes into standby to 15 minutes and leave the devices untouched for months. In the event of a power failure, the UPS should allow me to access my data on my laptop for fifteen minutes. Or improve my power outage experience with a (short) movie from the Plex server on my NAS. According to the UPS, it could last a total of 85 minutes before the battery dies from the combined router, modem, Switch and NAS power draw. Together, they use an average of 64 watts. If I set the maximum UPS power draw to half – 360 watts – it could last 14 minutes, according to the manufacturer. At full load, it shuts down after seven minutes.
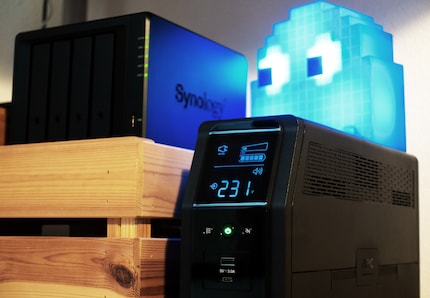
There were no further power outages during the entire test period. But at the beginning of January, after a month, I suddenly notice that seven events are listed on the UPS display. A look at the log file on my NAS reveals that from the 24th to the 27th as well as on the 30th of December there were a total of six switchovers to battery operation. Since I deactivated the alarm, I didn’t notice this at the time. And since my oven clock and other appliances continued to do their job on those days, I assume this came down to minor voltage fluctuations in the power grid. These took place shortly after four o’clock or at eight o’clock in the morning. They lasted from six seconds to just over a minute.
Then nothing happened for three months. Therefore, I believe the high sensitivity preset still fits the current electricity situation.
If the battery is completely drained, it needs about 16 hours to recharge. The device remains just as quiet during charging as during normal operation.
Verdict: a great device sporting old-fashioned PC software
APC’s Back-UPS Pro 1200SI is an easy-to-use, solid, and flawlessly performing device. I especially like that it’s relatively compact, access to the battery is easy, and the display is large. The latter is also bright and provides useful information.
What I don’t like is that APC only offers the PowerChute Personal Edition software for Windows. It should also be available for Mac and Linux. And it needs a facelift; it’s got an outdated design.
The price is decent. Very few competing devices cost less while possessing a similar power output and battery capacity. I can recommend the APC UPS.
I find my muse in everything. When I don’t, I draw inspiration from daydreaming. After all, if you dream, you don’t sleep through life.
